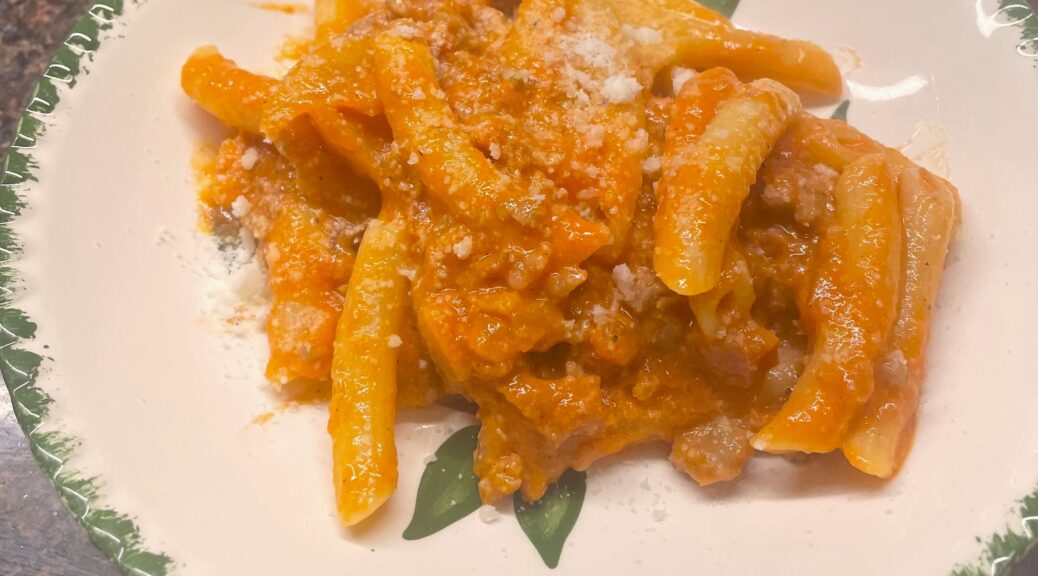
Smash BurgerThe Perfect Smash Burger Recipe: A Step-by-Step GuideSmash Burger

Smash Burger Recipe

Are you ready to elevate your burger game to new heights? In this comprehensive guide, we’ll delve into the secrets of crafting the perfect smash burger, drawing inspiration from the iconic Dyer’s Burgers on Beale Street in Memphis, Tennessee. Get ready to savor the juicy goodness of a burger cooked to perfection, with a technique that involves a unique twist—deep frying in beef fat!

The Dyer’s Burgers Experience

The legendary Dyer’s Burgers on Beale Street in Memphis, Tennessee. Learn about their unconventional method of deep frying burgers in beef fat that hasn’t been changed for years. Discover the mouthwatering menu featuring not only smash burgers but also delightful treats like deep-fried Twinkies and PB&Js.


The Ingredients You’ll Need

Before you embark on your smash burger journey, gather the essential ingredients. From bacon fat (or cooking oil) to ground beef, salt, black pepper, red onions, and cheddar cheese, we’ll guide you through selecting the best components for a flavor-packed experience.

Preparing the Onions

Begin your Smash Burger Recipe masterpiece by sautéing red onions in bacon fat until they reach the perfect balance of softness and caramelization. These onions will add a sweet and savory touch to your burger, creating a symphony of flavors with each bite.

The Art of Smashing

Learn the art of smashing a burger patty to perfection. Roll approximately 4 ounces of ground beef into a ball, then flatten it in a pan with hot bacon fat. Use a spatula and wooden spoon to achieve the ideal thickness. Sprinkle salt, pepper, and those delectable sautéed onions onto the patty.

Melting Cheese Magic

Elevate your burger by adding a layer of gooey cheddar cheese. Discover the best techniques for achieving the perfect cheese melt, ensuring each bite is a heavenly combination of textures and flavors.

Building Your Smash Burger Recipe

Assemble your smash burger on sliced whole grain bread or a hamburger roll. Dive into the world of condiments—whether it’s classic mustard, ketchup, mayo, or your favorite sauce, customize your creation to suit your taste buds.

Congratulations! You’ve just mastered the art of crafting the perfect Smash Burger Recipe. Whether you’re a seasoned chef or a kitchen novice, this step-by-step guide ensures a flavorful and satisfying experience. Channeling the spirit of Dyer’s Burgers, you’re now equipped to create a burger that stands out from the rest—juicy, flavorful, and unforgettable. Happy smashing! Ready to elevate your burger game? Have questions or want to share your experience? Contact us now for burger brilliance

Click here for updated GALLERY
Portfolio and Yelp

Sicilian Culinary Delight: Roasted Peppers with Breadcrumbs Recipe

Roasted Peppers
Whenever I visit my Sicilian brother-in-law, I’m treated to a culinary masterpiece that rarely graces Italian restaurant menus—Roasted Peppers with Breadcrumbs. This delectable dish holds a special place in his heart as it’s his mother’s cherished recipe, bringing a taste of Sicily to our lunch gatherings. Today, I’m excited to share this authentic Sicilian delight with you, complete with the tantalizing aroma of roasted peppers, the richness of breadcrumbs, and a symphony of flavors that make it the perfect side dish.

Ingredients

To recreate this Sicilian gem in your own kitchen, gather the following ingredients:

  • 4 or 5 red or yellow bell peppers
  • 2 tablespoons of olive oil
  • 1 thinly sliced onion
  • Salt and black pepper to taste
  • 2 tablespoons of yellow raisins
  • 2 tablespoons of chopped pistachios or walnuts
  • ¼ cup breadcrumbs
  • ¼ cup Parmesan grated cheese

Cooking Instructions

Now, let’s dive into the culinary journey of crafting Roasted Peppers with Breadcrumbs.

Preheat 

Begin by preheating to 400°F. This ensures the peppers achieve that perfect roasted tenderness

Begin by preheating to 400°F. This ensures the peppers achieve that perfect roasted tenderness.

Roasted Peppers with Breadcrumbs

Roast, Peel, and Slice the Peppers

Roast the red or yellow bell peppers until their skins char and blister. Once roasted, carefully peel and slice them, revealing their smoky-sweet flavor that forms the foundation of this dish.

Sauté the Onion

In a pan, heat 2 tablespoons of olive oil and sauté the thinly sliced onion with a pinch of salt and black pepper. Cook until the onions become soft and translucent, infusing the kitchen with enticing aromas.

Combine Peppers and Onions

Add the roasted peppers to the sautéed onions, creating a harmonious blend of flavors. Allow them to mingle and cook together for approximately 10 minutes, letting the sweetness of the peppers complement the savory undertones of the onions.

Add Raisins and Nuts

Introduce 2 tablespoons of yellow raisins and 2 tablespoons of chopped pistachios or walnuts to the pan. This addition brings a delightful contrast of textures and flavors, elevating the dish to new heights.

Sprinkle Breadcrumbs and Parmesan

As the aroma intensifies, sprinkle ¼ cup of breadcrumbs over the mixture, ensuring they absorb the savory juices. Follow this with a generous ¼ cup of grated Parmesan cheese, enriching the dish with a cheesy goodness that ties everything together.

There you have it—Roasted Peppers with Breadcrumbs, a Sicilian culinary delight that captures the essence of family, tradition, and the rich flavors of Italy. Whether served as a side dish or the star of the meal, this recipe is a testament to the artistry of Sicilian cuisine. Try it in your kitchen, and let the vibrant flavors transport you to the sun-kissed landscapes of Sicily. Buon Appetito! Craving Sicilian flavors? Contact us now to embark on your culinary journey with the Roasted Peppers with Breadcrumbs Recipe!Roasted Peppers with Breadcrumbs

Click here for updated GALLERY
Portfolio and Yelp

Grilled Vegetables Recipe: Elevate Your Outdoor Cooking Experience

Grilled vegetables recipe

Who says grilling is just for burgers and steaks? If you’re looking to add a burst of flavor and a dose of health to your outdoor cooking repertoire, grilled vegetables are the way to go. Whether you’re a seasoned grill master or a novice with a grill pan, this simple and versatile Grilled vegetables Recipe is bound to make your taste buds dance.

The Vegetable Medley

Let’s start with the colorful cast of characters – 1 eggplant, 1 bell pepper, 2 zucchinis, and 1 onion. Chop them into bite-sized pieces; after all, you want each forkful to be a symphony of flavors. Sprinkle them with a pinch of salt, a dash of black pepper, and if you’re feeling

adventurous, half a teaspoon of cumin. Drizzle with the liquid gold of the kitchen – olive oil. Now, give it a good toss. This is your vegetable medley in the making.

Ingredients:

  • 1 eggplant
  • 1 bell pepper
  • 2 zucchini
  • 1 onion
  • Salt and black pepper
  • ½ tsp, cumin (optional)
  • Olive oil
  • Garlic
  • Balsamic vinegar

Grilled Vegetables

The Grill Dance

Whether you’re firing up the outdoor grill or embracing the convenience of a grill pan, the next steps are crucial. Picture this: the sizzle of vegetables hitting the hot surface, the aroma wafting through the air. Lightly brush your heated pan or grill grates with oil – a sneak peek into the secret behind those perfect grill marks.

Place your veggies on the grill with care, and let them dance with the flames. A quick turn is all they need to get those beautiful grill marks on both sides. This is where the magic happens – the smoky char mingling with the inherent sweetness of the vegetables. It’s a symphony of flavors that’ll have you questioning why you haven’t grilled vegetables sooner.

Dressing Up the Delight

Sure, the Grilled vegetables recipe are already a star on their own, but why not add a touch of glam? Enter the garlic-infused dressing. Take a head of garlic, slice it in half, and wrap those golden cloves in foil with a generous pour of olive oil. Let them roast at 350°F in your preheated oven for 20 minutes. The result? Garlic that’s transformed into a creamy, caramelized delight.

Once cooled, squeeze the roasted cloves into a bowl. Now, it’s time to play chef. Add a splash of balsamic vinegar, a drizzle of olive oil, and a sprinkle of salt and pepper. Give it a stir, and voilà – you’ve just whipped up a dressing that elevates your grilled vegetables to a whole new level

Grilled Vegetables

A Symphony of Flavors

Picture this: a plate piled high with vibrant grilled vegetables, each piece infused with the smokiness of the grill and the richness of the garlic dressing. The fork effortlessly glides through a medley of textures and tastes – the tender eggplant, the crisp zucchini, the sweet bell pepper, and the caramelized onion. It’s not just a meal; it’s a symphony of flavors celebrating the union of simplicity and sophistication.

The Verdict

Grilled vegetables aren’t just a side dish; they’re a culinary masterpiece. They’re proof that healthy eating can be a festival of flavors, a celebration of textures, and an ode to the art of grilling. So, the next time you fire up the grill, let your creativity run wild. Experiment with different vegetables, tweak the seasonings, and make it your own. Because in the world of grilled vegetables, there are no rules – only endless possibilities for deliciousness.Grilled VegetablesGrilled vegetables transcend the realm of side dishes, becoming a culinary masterpiece. This symphony of flavors, enhanced by a garlic-infused dressing, celebrates the union of simplicity and sophistication. Embrace the endless possibilities in the world of grilled vegetables; let your creativity flourish on the grill. For more culinary inspiration, contact us today.

Click here for updated GALLERY
Portfolio and Yelp

Mojito Magic: A History and Mixology Dive | Robertiulo.com

diy mojito recipe

Hey there, DIY cocktail enthusiasts! Today, we’re diving into the refreshing world of DIY Mojito recipes and mojito mixology, exploring not just the delicious DIY Mojito recipe but also the fascinating stories behind its creation. Grab your muddlers, and let’s embark on a journey through time and taste.

The Mojito’s Origins: Sailing Through History

One captivating theory surrounding the birth of the Mojito takes us back to the New World and English sailors seeking refuge from scurvy. Imagine sailors sipping on a concoction of mint, lime, and rum to ward off the dreaded disease. Now that’s a far cry from the glamorous image we associate with this classic cocktail! Another tale brings us to the Caribbean, where African slaves infused their aguardiente with a bit of magic. They called it “mojito,” drawing inspiration from “mojo,” a term associated with magic spells or charms. It’s amazing how history and mojito mixology can intertwine in such unexpected ways.

The Mojito Mix: Crafting the Perfect Elixir

Now, let’s get down to the nitty-gritty – the ingredients for your perfect DIY Mojito recipe. To whip up your own mojito mix magic, you’ll need:

  • 6 mint leaves
  • ½ oz. simple syrup
  • 2 oz. white rum
  • ¾ oz. lime juice
  • Club soda (optional)
  • Garnish: mint sprig
  • Garnish: lime wheel

In our shaker, we start by muddling the mint with a splash of simple syrup. This step extracts those essential minty flavors. Next up, add the star of the show – 2 ounces of white rum, a generous ¾ ounce of lime juice, and a handful of ice cubes. Give it a good shake, letting the ingredients dance together. Now, we strain this concoction into a highball glass over fresh ice. For a bit of effervescence, you can top it off with a splash of club soda or sparkling mineral water. Picture the bubbles tickling your taste buds.

Garnish and Presentation: A Feast for the Eyes

No Mojito is complete without its final touches. Garnish your creation with a fresh mint sprig – it adds a burst of fragrance and visual appeal. For that extra touch of citrusy flair, throw in a lime wheel. Voila! Your DIY Mojito recipe masterpiece is ready to be sipped and savored.

Sip Back and Enjoy the Magic

The Mojito isn’t just a delightful blend of mint, rum, and lime; it’s a concoction with a rich history, rooted in tales of sailors and slaves, scurvy, and charms. So, the next time you take a sip of this classic cocktail, let the flavors transport you through time, and relish in the magic that is the Mojito. Cheers to your newfound expertise in mojito mixology!

Ingredients:

  • 6 mint leaves
  • ½ oz. simple syrup
  • 2 oz. white rum
  • ¾ oz. lime juice
  • Club soda, to top – optional
  • Garnish: mint sprig
  • Garnish: lime wheel
Muddle the mint with the simple syrup in a shaker. Add the rum, lime juice and ice, and shake. Strain into a highball glass over fresh ice. Top with a splash of club soda or sparkling mineral water if you like. Garnish with a mint sprig and lime wheel.

Click here for updated GALLERY
Portfolio and Yelp

Crafting Perfection: The Last Word Cocktail Recipe Unveiled

best cocktail recipe

Hey there cocktail enthusiasts! Today, let’s embark on a delightful journey into the world of mixology as we unravel the secrets behind the captivating Last Word cocktail. Picture this: a cozy dinner, friends gathered, and the pièce de résistance – The Last Word Cocktail. Trust me; you’re in for a treat!

Our recent family dinner was graced by the presence of our lovely granddaughter, Molly, and her friends. After a satisfying meal, we decided to elevate the evening with a touch of sophistication – espresso and a unique after-dinner drink featuring the mysterious Green Chartreuse. Produced by the enigmatic French Carthusian monks, this liqueur is a concoction of over a hundred herbs, including the surprising addition of cannabis. The exact recipe? Well, that’s a closely guarded secret held by the monks themselves.

Now, Chartreuse is undoubtedly exquisite on its own, meant for slow sipping and savoring each intricate flavor. However, we’re about to take it up a notch by introducing you to The Last Word cocktail – a blend of gin, maraschino liqueur, Green Chartreuse, and a dash of fresh lime juice. Brace yourself for an explosion of flavors that will leave your taste buds tingling with delight.

Crafting The Last Word Cocktail

Let’s dive into the magic of crafting this exceptional cocktail. The Last Word brings together the following ingredients:

¾ oz. Gin

¾ oz. Maraschino liqueur

¾ oz. Green Chartreuse

¾ Fresh Lime Juice

Here’s the secret handshake to unlock the magic:

Combine and Shake: Gather all the ingredients in a cocktail shaker generously filled with ice. The gin, maraschino liqueur, Green Chartreuse, and fresh lime juice join forces in a dance of flavors.

Shake, Shake, Shake: Give it a good shake, allowing the ice to meld with the ingredients, creating a symphony of tastes that will dance on your palate.

Strain and Serve: Strain the concoction into a chilled cocktail glass, and behold the liquid masterpiece you’ve just created.

Garnish with Elegance: Complete the ritual by garnishing your creation with a cherry. This final touch adds a touch of sweetness that harmonizes with the bold flavors of the cocktail.

The Last Word Unveiled

As you take that first sip of The Last Word, you’ll be greeted by an intricate balance of herbal notes from the Green Chartreuse, the subtle sweetness of maraschino liqueur, and the citrusy kick from the fresh lime juice. The gin, like a maestro, conducts this symphony, ensuring that each ingredient plays its part without overshadowing the others.

This cocktail isn’t just a drink; it’s an experience, an exploration of flavors that will have you pondering the artistry behind mixology. The Last Word is not just a recipe; it’s a testament to the creativity that arises when different ingredients come together in perfect harmony.

Why The Last Word Stands Out

In the vast universe of cocktails, The Last Word has earned its place as a timeless classic. Its unique combination of ingredients sets it apart, making it a favorite among both seasoned cocktail aficionados and those new to the world of mixed drinks.

The balance of sweet, herbal, and citrusy notes makes The Last Word a versatile concoction suitable for various occasions. Whether you’re hosting a soirée or seeking a nightcap that transcends the ordinary, this cocktail is your ticket to a world of refined taste.

Conclusion

As we wrap up our exploration of The Last Word cocktail, we invite you to step into the realm of mixology and try your hand at crafting this masterpiece. Share it with friends, savor it slowly, and let the flavors transport you to a place where every sip is a celebration of craftsmanship.

The Last Word isn’t just a cocktail recipe; it’s an invitation to indulge in the art of mixology. So, gather your ingredients, don your imaginary bartender hat, and let the alchemy of flavors unfold in the comfort of your home. Cheers to The Last Word – the best cocktail recipe that promises an unforgettable journey for your taste buds!

Click here for updated GALLERY
Portfolio and Yelp

Elevate Your Summer with Irresistible Barbecue Chicken Wings

Barbecue Chicken Wings

Hey there, fellow food enthusiasts! Today, we’re diving into the world of finger-lickin’ goodness with a recipe that’s bound to make your taste buds dance – Barbecue Chicken Wings! Now, don’t be fooled by the name; these wings may not hit the grill, but they sure do sizzle with the rich flavors of a perfect barbecue sauce. Join us on this culinary adventure as we guide you through crafting the most delectable Barbecue Chicken Wings you’ve ever tasted.

Barbeque Chicken WingsIngredients:

Ingredients


– 2 tbsp. apple cider vinegar
– 1 tbsp. Worcestershire Sauce
– 1 tsp. hot or mild paprika
– ½ tsp. garlic powder
– ¼ tsp. cayenne (adjust to your spice preference)
– 2 lbs. (7 or 8) chicken wings
– Salt and black pepper to taste
– 3 tbsp. butter

Let the Marination Begin

Preheat your oven to a toasty 350 degrees. Pat your chicken wings dry and generously season them with a sprinkle of salt and black pepper. In a large bowl, play maestro by combining ketchup, apple cider vinegar, Worcestershire Sauce, paprika, garlic powder, and cayenne. Add the chicken to this flavor fiesta, ensuring each wing is thoroughly coated with the marinade.

Sizzling on the Stovetop

In an oven-proof pan, melt the butter over high heat. Shake off any excess marinade from the wings and let them take a quick dip in the pan. Give them a toss and turn for about 8-10 minutes until you witness the magic – those edges crisping up and browning to perfection.

Oven Magic

Now, let’s let the oven do its thing. Place the pan in the preheated oven for 10-12 minutes to finalize the cooking process. As the wings reach their crispy nirvana, remove them to a waiting plate, leaving behind the tantalizing aroma of barbecue goodness.

Sauce It Up

But wait, we’re not done yet! Pour the remaining marinade into the pan, set it on low heat, and add ½ cup of water. Scrape up those flavor-packed brown bits as the sauce transforms into a luscious, thick concoction. Return the wings to this saucy paradise, ensuring they’re generously coated.


Serve and Indulge

And there you have it – a symphony of flavors that will have your taste buds singing in delight! Serve these Barbecue Chicken Wings hot, and watch them disappear as your friends and family savor every juicy, flavorful bite.
Barbeque Chicken Wings
So, there you have it, a culinary masterpiece that delivers on both taste and simplicity. Our Barbecue Chicken Wings are perfect for summer gatherings, backyard barbecues, or simply when the craving for something irresistibly delicious strikes. Get ready to elevate your summer
with these mouthwatering wings – because life’s too short for bland food! Ready to elevate your summer flavors? Contact us now and embark on a culinary adventure with our Irresistible Barbecue Chicken Wings! Let’s make your taste buds dance.

Click here for updated GALLERY
Portfolio and Yelp


The Perfect Pepper and Egg Sandwich Recipe: A Taste of Italian Delight

Egg Sandwich Recipe

The Pepper and Egg Sandwich Recipe, a classic Italian lunchtime delight, is a savory combination of flavors and textures that can transport you straight to the heart of an Italian neighborhood. In this blog post, we’ll explore the simplicity of crafting the perfect pepper and Egg Sandwich Recipe in the comfort of your own kitchen.

Ingredients and Preparation

To embark on this culinary journey, gather the following ingredients:

  • 1/3 cup olive oil
  • Salt and black pepper
  • 1 green bell pepper, sliced
  • 3 large eggs
  • Italian bread

Begin by preheating the broiler with the upper rack as high as possible. In a heavy pan, heat the olive oil and add the sliced green bell pepper. Season with salt and black pepper, and sauté until the edges of the bell pepper begin to brown, infusing the oil with rich flavors.

Creating the Flavorful Filling

In a bowl, beat the eggs and pour them into the pan, stirring gently to coat the pepper slices with the egg mixture. The ratio of one bell pepper to three large eggs ensures a

harmonious blend of ingredients. Allow the eggs to set, but ensure the top remains slightly moist.

Finishing Touches Under the Broiler

For the finishing touch, place the pan under the broiler for 2 to 3 minutes, allowing the sandwich filling to cook to perfection. This step not only adds a golden hue to the eggs but also imparts a delightful texture, creating a mouthwatering experience.

The Art of Presentation

As any culinary artist would attest, presentation is key. Once the pepper and egg Sandwich Recipe filling is ready, carefully assemble your sandwich on fresh Italian bread. The combination of the crispy yet tender eggs and the sautéed bell pepper nestled within the bread creates a masterpiece of textures and flavors.

Conclusion

Whether you’re craving a taste of Italy or looking to spice up your lunch routine, the pepper and egg sandwich is a simple yet exquisite choice. With just a handful of ingredients and a dash of culinary finesse, you can savor the essence of an authentic Italian deli right in your own kitchen. Try this recipe, and let the symphony of flavors transport you to the charming streets of an Italian neighborhood. Buon appetito! Craving a bite of Italian perfection? Contact us now to savor The Perfect Pepper and Egg Sandwich. Your taste buds await! Read more for https://robertiulo.com/

Click here for updated GALLERY
Portfolio and Yelp

Dom’s Ultimate Steak and Onions Recipe | Robertiulo.com

Pasta con Sarde

Sicilian cuisine, with its rich flavors and unique combinations, has a captivating way of bringing tradition to the modern table. One such dish that embodies the spirit of Sicily is Pasta Con Sarde. However, while the traditional recipe demands meticulous preparation, we present a shortcut version that retains the authentic taste with a fraction of the effort – the Facile Pasta con Sarde.

A Culinary Adventure Begins: Unraveling the Ingredients

In the heart of this Sicilian delicacy lies a carefully curated list of ingredients that dance harmoniously on the palate. To embark on this culinary journey, gather the following:

  • ¼ cup olive oil
  • Salt, black, and red pepper
  • 3 cloves garlic, sliced
  • 1 can sardines packed in olive oil
  • 1 ½ lbs. ripe tomatoes
  • ½ pound long pasta

A Symphony of Flavors: Crafting the Facile Pasta con Sarde

The beauty of this simplified version lies not only in its ease of preparation but also in its ability to encapsulate the essence of the traditional dish.

Grate the Tomatoes:

Begin by grating the tomatoes using the large holes of a box grater. This step unlocks the vibrant flavors of the tomatoes, infusing the dish with a freshness that is characteristic of Sicilian cuisine.

Sauté and Simmer:

Heat a pot with olive oil over low flame and sauté the sliced garlic until it releases its aromatic essence. Season with salt and pepper before introducing the star of the dish – Pasta con Sarde. Break them up in the pot, allowing the amalgamation of flavors as they simmer for a tantalizing five minutes.

Tomato Infusion:

Introduce the grated tomatoes to the pot, setting the stage for a flavor explosion. Bring the concoction to a gentle boil, then lower the heat, letting it simmer for an indulgent 30 minutes. This slow-cooking process allows the ingredients to intertwine, creating a symphony of taste that defines Pasta Con Sarde.

Pasta Alchemy:

Meanwhile, in a separate pot of salted water, cook the long pasta until it’s almost done. The magic happens when you transfer it to the simmering sauce, allowing the pasta to absorb the rich flavors as it finishes cooking. This technique ensures that every strand is a carrier of the distinct taste of Sicily.

Embracing Tradition: The No-Cheese Rule and Artful Garnishes

As we delve deeper into the authenticity of Pasta Con Sarde, it’s crucial to note the culinary traditions upheld by this Sicilian masterpiece. In staying true to its roots, this dish vehemently rejects the addition of cheese. However, fear not, as a sprinkle of toasted breadcrumbs or a garnish of chopped parsley proves to be the perfect finishing touch.

A Visual Feast: Serving and Presentation

The true allure of Sicilian cuisine lies not only in its taste but also in its visual appeal. Present your Facile Pasta con Sarde with a touch of finesse – perhaps on a rustic plate or a bed of fresh fennel fronds. The vibrant colors and textures will not only satisfy your taste buds but also elevate the dining experienc

Conclusion

In the creation of Facile Pasta con Sarde, we’ve successfully condensed the intricate steps of the traditional recipe without compromising on the richness of flavors. This shortcut version serves as a testament to the adaptability of Sicilian cuisine, allowing you to savor a taste of Italy’s culinary heritage without an extensive time commitment.

As we conclude our exploration into the world of Pasta Con Sarde, it’s evident that simplicity does not equate to a lack of depth in flavor. Rather, it’s a celebration of the artistry behind crafting a dish that captures the spirit of Sicily in every bite. So, set your table, savor the moment, and let the Facile Pasta con Sarde be your gateway to the enchanting world of Sicilian gastronomy. Buon Appetito!

Click here for updated GALLERY
Portfolio and Yelp


A Flavorful Delight: Crafting the Perfect Curry Chicken Recipe at Home

Curry Chicken Recipe

The rich tapestry of Indian cuisine is an experience like no other, and one dish that never fails to captivate taste buds is the classic Curry Chicken Recipe. This aromatic and hearty dish is a symphony of spices, and with a simple yet sensational recipe, you can bring the essence of Indian flavors right into your kitchen.

Curry Chicken

Curry Chicken Recipe

Ingredients:

  • 2 tbsp. olive oil
  • 1 medium yellow onion, chopped
  • 2 lb. boneless skinless chicken breasts, cut into 1″ pieces
  • 3 cloves garlic, minced
  • 2 tbsp. curry powder (mixture of 1 tbsp. minced ginger, 1 1/2 tsp. paprika, 1 1/2 tsp. ground turmeric, 1 1/2 tsp. ground coriander, and 1 tsp. ground cumin)
  • 1 (15-oz.) can crushed tomatoes
  • 1 1/2 cup chicken broth
  • 1/2 cup heavy cream
  • Salt & black pepper to taste

Instructions:

Searing the Foundation

Begin by heating 2 tbsp. of olive oil in a large pot over medium-high heat. Add the chopped onion and sauté until soft, creating a flavorful base for the curry.

Chicken Dance

Introduce 2 lbs. of boneless, skinless chicken breasts cut into bite-sized pieces to the pot. Sear the chicken until it loses its pink hue, locking in succulent flavors with every golden-brown exterior.

A Symphony of Aromatics

Stir in 3 cloves of minced garlic, elevating the aromatic profile of the dish. Then, add 2 tbsp. of the carefully crafted curry powder, ensuring each piece of chicken is generously coated. Let the spices meld for 2-3 minutes, releasing their essence into the dish.

Tomato Tango

Integrate a 15-oz. can of crushed tomatoes into the pot, followed by 1 1/2 cups of chicken broth. Allow the ingredients to dance into a simmer, creating a harmonious blend of textures and flavors.

Creamy Crescendo

To enrich the curry’s texture and taste, pour in 1/2 cup of heavy cream. Stir gently to incorporate the cream, creating a luscious and velvety sauce.

Seasoning Serenade

Season the curry with salt and black pepper, tailoring the taste to your preference. Let the curry simmer for 15-20 minutes, allowing the chicken to absorb the myriad of flavors.

Culmination and Presentation

As the chicken pieces reach tender perfection, your curry is ready to be served. Present this culinary masterpiece over a bed of fragrant basmati rice, allowing the symphony of flavors to take center stage.Curry Chicken.

Embark on a culinary journey with this straightforward Curry Chicken recipe, and savor the tantalizing blend of spices, tender chicken, and creamy goodness. Bring the magic of Indian cuisine to your table, and let the aroma of this dish create lasting memories around your dining table. Ready to spice up your kitchen? Contact us for tips, variations, or share your Curry Chicken recipe experience. Let’s chat flavors!

Click here for updated GALLERY
Portfolio and Yelp


Dom’s Best Steak and Onions Recipe | Robertiulo

best steak and onions recipe

From the nostalgic pages of Seward Park High School’s yearbook, I find myself transported back to the vibrant streets of Broome Street. It was in the heart of that bustling neighborhood that Dom’s Luncheonette stood as a culinary haven, run by an Italian family with a passion for crafting unforgettable flavors. One dish, in particular, etched its place in my memory—Dom’s Steak and Onions. Today, we embark on a culinary adventure to recreate the magic of Dom’s iconic dish, unlocking the secrets of the best steak and onions recipe.

A Walk Down Memory Lane

As a proud member of the Class of ’65, I often found solace and delight in the aromatic haven that was Dom’s Luncheonette. The familial atmosphere, the clinking of utensils, and the sizzle of steak on the grill created an ambiance that resonated with the essence of good food and good company. Dom’s Steak and Onions, a culinary masterpiece served on a plate, left an indelible mark on my taste buds

The Ingredients that Bring Memories to Life

To recreate this culinary delight, we start with the essentials:

  • 1 lb. strip steak
  • Olive oil for frying
  • 1 or 2 Spanish onions, sliced in half moons
  • Salt and black pepper
  • 2 tbsp. tomato paste
  • ½ tsp. oregano
  • 2 bay leaves
  • ¼ cup tomato puree
  • ½ cup red wine or water

The Symphony of Flavors: Crafting Dom’s Best Steak and Onions Recipe

Begin this culinary adventure by bringing the steak to room temperature, generously seasoning it with salt and black pepper. The key to a perfect sear is a hot pan, so let it sizzle with olive oil and sear the steak until lightly browned. Don’t fret if it’s still rare; the magic happens with the onions.

Remove the steak and let it rest, then dive into the world of onions. Sauté them until they soften, seasoning with a dash of salt and pepper. Introduce the tomato paste, letting it dance with the onions, followed by the aromatic duo of oregano and bay leaves.

Now, trim excess fat from the rested steak and slice it into quarter-inch strips. Return these succulent strips to the pan, where they reunite with the onions. Pour in the tomato puree and half a cup of red wine or water, stirring the concoction into a savory symphony. Bring it to a boil, then lower the heat, cover, and let it simmer for 15 minutes.

Should you find the need, add water to maintain the desired consistency. Taste this savory creation and adjust the seasoning to your liking. Dom would often serve this masterpiece with rice or as a sandwich on fresh Italian bread.

Crafting Culinary Bliss: A Steak and Onion Sandwich a’ la Dom’s Luncheonette

Picture this: a steak and onion sandwich a’ la Dom’s Luncheonette, a delightful combination of savory steak, perfectly caramelized onions, and a sauce that encapsulates the essence of Dom’s culinary artistry. The marriage of flavors and textures is nothing short of divine.

As you sink your teeth into this creation, the memories of Broome Street flood back—the laughter, the camaraderie, and the shared joy of savoring the best steak and onions recipe. Dom’s legacy lives on in each bite, transcending time to bring the warmth of the past into the present.

A Culinary Journey Continues

In recreating Dom’s Best Steak and Onions Recipe, we not only celebrate the flavors of a bygone era but also pay homage to the culinary artisans who enriched our lives. This journey is a testament to the timeless nature of good food, the kind that evokes cherished memories and invites us to share the experience with the next generation.

As the aroma of sizzling steak and caramelized onions wafts through your kitchen, you become a part of a culinary legacy — a legacy that started in a small luncheonette on Broome Street and now finds a place in your home. So, gather your ingredients, set the stage, and embark on a culinary adventure that transcends time, all while savoring the magic of Dom’s Best Steak and Onions Recipe.

Click here for updated GALLERY
Portfolio and Yelp

Reveries and Recipes